by capedemo | Oct 3, 2022 | Cooking with Cape Demo
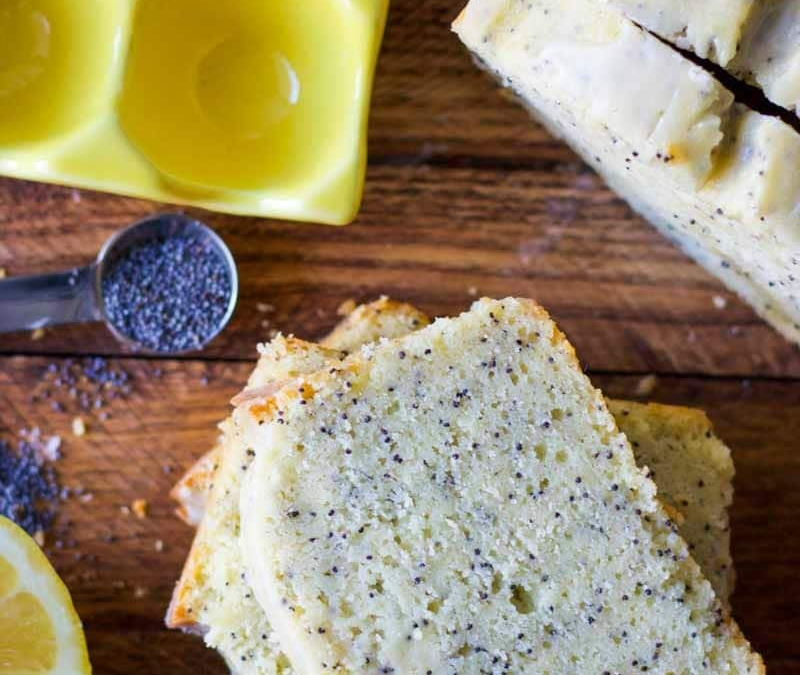
This recipe has just the right amount of zing from the juice and zest of a lemon and the poppyseeds give it a great texture for a little crunch in every bite. It’s moist and the citrus adds a little pop of flavour the moment you sink your teeth in.
Ingredients
For the Bread:
- 1 3/4 cups all purpose flour
- 1 teaspoon baking powder
- 1/2 teaspoon salt
- 3/4 cup butter melted
- 1 cup granulated sugar
- 3 eggs
- juice of 1 lemon
- zest of 1/2 lemon
- 1/4 cup sour cream
- 2 tablespoons poppy seeds
- 3/4 cup milk
For the Icing:
- 1 cup powdered sugar
- 2 tablespoons water
Instructions
- Heat oven to 150C and thoroughly grease a 23x13x8 cm loaf pan. Set aside.
- In a medium bowl, mix together the flour, baking powder and salt. Set aside.
- Using a handheld mixer or stand mixer, beat together the melted butter and sugar until it turns a pale light colour, about 3 minutes. Slowly add the eggs to the mixture with the mixer on low speed. Add the lemon juice, zest, sour cream and poppy seeds and mix until combined, about 1 minute.
- Keeping the mixer on low, add half the milk and half the flour until combined. Add the remaining milk and the rest of the flour and gently fold using a rubber spatula until just combined.
- Transfer batter to the loaf pan, it’s okay if it doesn’t fill all the way. Bake in a preheated oven for 1 hour 10 minutes to 1 hour and 20 minutes. Start checking it at 1 hour and 10 minutes to see if the top middle is set. Check for doneness by inserting a toothpick in the center. If it comes out clean it’s done. Cool in pan for 20 minutes then transfer to the wiring cooling rack.
- While the bread is cooling in the pan, add the powdered sugar to a bowl with the water and mix well. Pour the icing over the bread while on the wire rack, with a piece of parchment underneath. Allow to cool completely. Store in an airtight container for up to a week or in the freezer for up to three months.
Thank you What Molly Made for this fresh and delicious recipe!

by capedemo | Sep 15, 2022 | Cooking with Cape Demo
This homemade garlic bread (or at least semi-homemade) offers crusty Italian bread, smothered in a buttery, garlicky cheese mixture and baked to perfection. With this garlic bread recipe . you get crispy edges, flavorful topping. This is the best cheesy garlic bread ever!
Ingredients
- 3/4 cup butter softened
- 1 tablespoons minced garlic
- 1 tsp garlic powder
- 1 tablespoon fresh parsley finely chopped
- 1/2 cup parmesan cheese
- 1 loaf Italian bread cut into about 1cm slices
- 1 tsp paprika
- 1/2 cup shredded mozzarella cheese
Instructions
- Preheat oven to 200 degrees
- In a small bowl, mix together butter, minced garlic, garlic powder, parsley, and parmesan cheese.
- Slice the Italian bread into about 1cm, and spread the butter mixture over each piece.
- Place on a baking tray.
- Sprinkle with a little paprika.
- Bake for 10 minutes until the butter mixture is melted, and bread is slightly toasted.
- Remove from oven, and sprinkle with mozzarella cheese
- Turn oven to broil, and return bread to oven, broiling until cheese is melted, and edges are golden brown (1-2 minutes)
Notes
- Keep a close eye on the broiling as you do not want to burn the bread, and it can go from beautifully golden to burnt in a matter of minutes. Garnish with additional fresh parsley if desired.
Thank you Eazy Peazy Mealz for this cheeselicious recipe!
by capedemo | Sep 15, 2022 | Cooking with Cape Demo
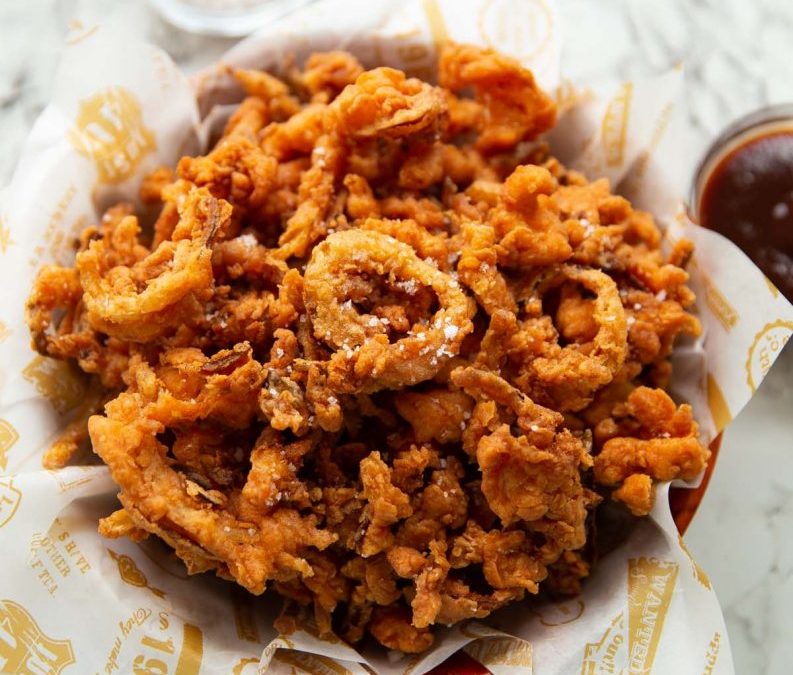
Once you master the crispy onion there’s no going back. Whip up a batch of these just to snack on – mainly because they’re insanely delicious, but also because they’re so darn easy to make!
Equipment
- Sharp Knife & Chopping Board
- Medium Sized Mixing Bowl
- Large Shallow Dish
- Pot (suitable for deep frying)
- Slotted Spoon & Tongs
- Tray & Paper Towels
- Kitchen Thermometer
Ingredients
- 1 large White Onion, peeled & very thinly sliced (see notes)
- 2 cups / 500ml Buttermilk, or as needed to cover onions (see notes)
- 1 1/2 cups / 225g Plain / All Purpose Flour
- 1 1/2 tsp EACH: Paprika, Baking Powder
- 3/4 tsp Salt (plus more to serve)
- 1/4 tsp White Pepper
- 4 cups / 1 liter Vegetable Oil, or as needed
Instructions
- In a medium sized mixing bowl combine onion slices and enough buttermilk to comfortably cover them. Leave to soak for 30 – 60mins. If you’re short on time just leave to soak as you prep the other steps.
- In a large shallow dish combine flour, paprika, baking powder, salt and white pepper. Use tongs to grab a small batch of the onions, give them a good shake to remove excess buttermilk, then add into the flour. Use a fork or your hands to fully coat them as best you can. Give them a shake to remove excess flour, place on a tray then repeat.
- Heat up oil in a suitably sized pot or pan to 180°C. Carefully lower in a batch of the onions and use tongs to immediately separate them if they stick together. Fry until deep golden and visibly crispy (around 2-5mins depending on how thick the slices are and how many you fry at once). Use a slotted spoon to remove them and place on paper towels then repeat. Bring temp back up to 180°C between batches. I find 3 batches works fine, just don’t overfill the pot or the oil temp will drop too much and they’ll all stick together.
- Sprinkle over salt to draw out the final bit of moisture then serve up in sandwiches or as finger food with a dip!
Thank you Something About Sandwiches for this crispy and delicious recipe!

by capedemo | Aug 2, 2022 | Cooking with Cape Demo
The best easy no-bake energy balls recipe made with just 6 ingredients! These oatmeal energy bites are made with protein powder for a filling and healthy snack.
Ingredients
- 1 ½ cups no stir creamy peanut butter
- ½ cup honey
- 1 ⅓ cups old fashioned oats (rolled oats)
- ½ cup vanilla protein powder
- ⅛ teaspoon salt
- ½ cup mini dark chocolate chips
Instructions
- Add the no stir creamy peanut butter, honey, rolled oats, vanilla protein powder, salt, and mini dark chocolate chips to a mixing bowl and use a rubber spatula to mix until the batter is combined
- Use a mini cookie scoop or a spoon to drop energy balls with a spoon onto a wax paper covered cookie sheet. They should be around 1 inch in size.
- Roll the energy balls with your hands to form the shape
- Place cookie sheet with the energy bites on it in the fridge for 1 hour, or until the balls are hardened
- Transfer energy balls to a ziploc bag and store in the freezer
Notes
What kind of protein powder should I use? Just use your favorite protein powder! I used vanilla protein powder in this recipe, but I love chocolate in it too. My personal favorite way to mix things up is to use half vanilla and half chocolate protein powder.
How many energy balls does this make? This makes 22 – 24 good sized energy bites. Each one has 6g of protein!
Are rolled oats the same thing as old fashioned oats? Yes they are! This is the kind of oats that you want for this recipe.
Thank you Build Your Bite for this tasty recipe!
by capedemo | Aug 2, 2022 | Cooking with Cape Demo
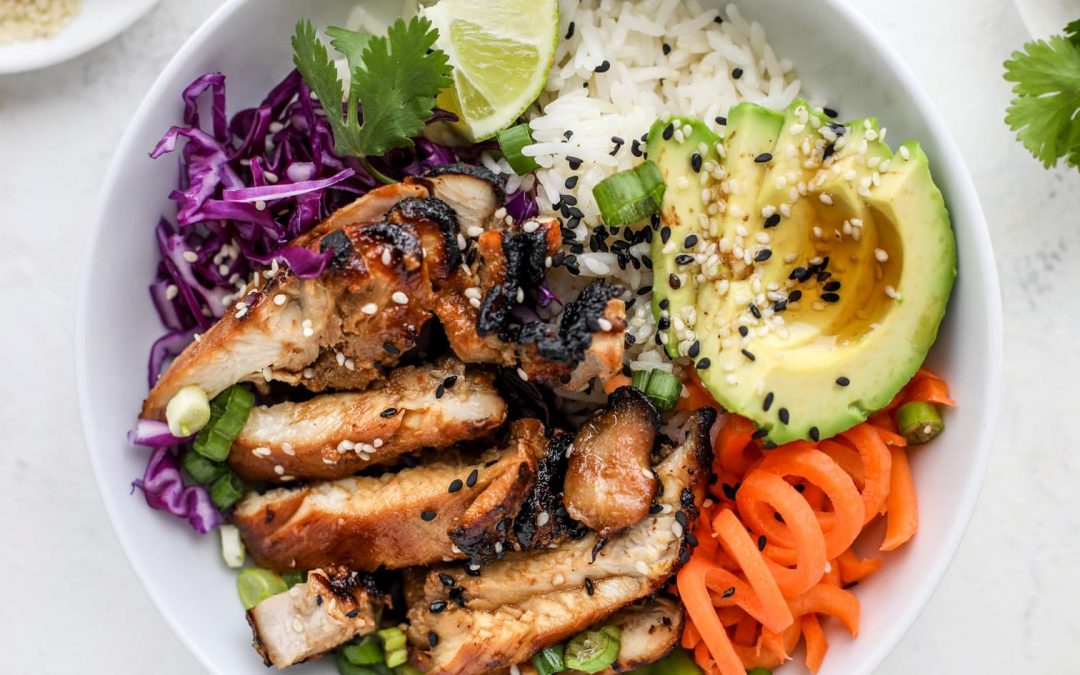
Sesame soy chicken bowls are loaded with flavor: toasted sesame, soy sauce and lime come together over coconut rice and avocado to create a delicious meal!
INGREDIENTS
CHICKEN
- Approx 700g boneless, skinless chicken thighs
- 3 tablespoons low sodium soy sauce
- 2 tablespoons brown sugar
- 2 tablespoons toasted sesame oil
- 1 tablespoon chili garlic sauce
- 2 garlic cloves, minced
- 1 teaspoon ground ginger
COCONUT RICE
- 1 1/2 cups jasmine rice
- 1 1/2 cups canned coconut milk
- 1/2 cup coconut water
- 1/4 teaspoon salt
- 1 1/2 tablespoons coconut oil
- 2 tablespoons finely shredded, unsweetened coconut (optional!)
FOR THE BOWLS
- 4 green onions, thinly sliced
- 3 large carrots, spiralized (or chopped!)
- 2 cups sliced red cabbage
- 1 or 2 avocados, thinly sliced
- 2 tablespoons toasted sesame seeds
- ¼ cup torn fresh cilantro
- 1 lime, cut into wedges for spritzing
INSTRUCTIONS
At least 30 minutes before (but you can do this overnight!), place the chicken in a resealable bag. In a small bowl, whisk together the soy sauce, sugar, sesame oil, chili garlic sauce, garlic cloves and ginger. Pour it over the chicken. This can marinate anywhere from 30 minutes to a full 24 hours!
To make the coconut rice, heat a saucepan over medium-high heat and add the rice, coconut milk, coconut water and salt. Stir, then bring to a boil. Reduce the heat to low, cover and let cook for about 30 minutes, until liquid is absorbed. Fluff with a fork, then stir in coconut oil. Stir in the shredded coconut and serve.
When you’re ready to make the chicken, heat the broiler on high and place a wire rack 3 to 4 inches below. Line a baking sheet with foil. Use kitchen tongs to pull the chicken from the marinade and place it on the foil. (Discard the remaining marinade.)
Broil the chicken for 7 minutes, then flip it and broil for 7 minutes more. If you don’t want to broil it, you can bake it at 220 °C for 30 minutes, then check to see if it is done. Let the chicken rest for 10 minutes before slicing it.
To assemble the bowls, add the coconut rice on the bottom. Top with the avocado, shredded cabbage and spiralized carrots, some green onions and a little cilantro. Add the chicken on top along with a few avocado slices. Top with toasted sesame seeds and a lime wedge. You can also drizzle on extra toasted sesame oil if you’d like!
Thank you How Sweet Eats for this decadent recipe!